Tuesday, November 1, 2011

Pirate's Vortex


This is another vortex quilt for my young great nephew who likes pirates.  I wish I had embroidered a white skull in the center.  The applique is machine stitch raw edge.  I used 2 layers of white in the applique to avoid shadowing.  The eyes and nose are appliqued onto the skull in black.  The jaw is a separate piece.
The next vortex will be with a chess theme also in black and white. 

Here is another vortex experiment that did not work out as I had hoped.  I cut wavy lines in making the wedges.  It was a real pain to sew together.  I must have taken up too much in the seam allowance because I needed more wedges to get a full circle.  Also, the wavey seams interrupt the swirl action of the vortex.  It was a learning quilt.

Thursday, April 21, 2011

Red and White 1910 Vortex Part 3

This is the original Vortex quilt on display at the Infanite Variety Quilt Show  by The American Folk Art Museum in NYC.   (Thanks Nan!)

Make Quadrants

Each quadrant has 13 wedges. 2 quadrants have outsides wedges that end in red, 2 have outside wedges that end in white.  Use the untrimmed wedges on the outside of the wedges.
It is a good idea to complete one quadrant, press and trim it before constructing the other 3.  Adjustments in sewing can  be made to avoid problems from the first quadrant when sewing the last 3 quadrants.

Consistancy in more important than 1/4" seams.  I found it easier to sew from the wide end of the wedge to the center.  Use a zipper foot to get your rows of stitching as close together as  posible in the center.  Try to get the quadrant to come to a point as much as possible.  It will not be completely posible because of the bulk of the threads and fabric, but that is why there is a dot in the center of the finished quilt.  If there is too much space between the seams at the point, a large dot will be needed.  My first quilt had a very large hole after putting together all 4 quadrants.  I ended up making a few more rows for the center to keep from having a dot much larger than I wanted.  That was a real pain!


Use the untrimmed wedges for the first and last wedges in a quadrant. 

Sew 13 wedges into a quadrant.  If you plan to sew wedges into pairs, then into a quadrant, be carefull to keep them in the correct order. The pair in this photo will not work in this quadrant, will be used in the next one.  The edges do not look straight in this photo, but they are.  The seam allowances are not flat.


Press all seams to one side.  Always press the seams the same way in all 4 quadrnts.

Here is a completed quadrant.  This one has a problem.  It is getting too narrow too quickly as it reaches the center.  I chose to let out a few seams, but a few seams could be made with a wider seam allowance closer to the outside of the quadrant. If nothing were done, the trimming will still make the quadrant square and the quilt will still lay flat.  Some of the pieces will be a bit larger or smaller than the rest in that circular "row".  You can decide how much adjusting you want to do.  This quilt is so busy that it hides a lot.


Time to Trim

Measure the last (larges) piece  of the wedges.  Make a small mark where the outside of the untrimmed wedges would have been cut if they had also been trimmed.  This is just to help you decide where you will trim the outside edges.  Try to have your adjustments for cutting shared by both edges of the quadrant as you trim the quadrant to be square.


Place a large square ruler on the center of the quadrant with a seam allowance on each side 1/4" away from the last row of stitching.  Add another ruler to extend the side out to the outer edge of the quadrant.  Do not cut just yet.  Draw a faint cutting line, then do the same on the other side.  You may want to shift the square ruler and cutting line a bit to make the wedges on each side share whatever adjustment was needed to make this quadrant square.   Also be carefull not to cut away an entire wedge secion on the narrow end.   It could be a case of making a compromise in the ruler placement, or even a bit more sewing adjustments.  When you are satisfied with the cutting line placement, trim the quadrant. 


Measure from the center edge of the quadrant to the outer edge along the center of some of the wedges.  Use an average of these numbers and measure along the seam lines.  Make  a mark near the outer edge along the seam lines.  Trim a small amount at these high points to make the quadrant a bit more round on the outer edge.


Make 3 more quadrants.  Use the first quadrant as a "go by" to get the last 3 to be as close as posible in size as the first.  Press all the quadrants in the same direction.

Border Sections

Fold a quadrant in half and press a crease.  Do not worry if the crease in not in the exact middle if a square.
Open the white fabric to a single layer.  Trim away the selvage edge.  Trim the end to form a square.  This will be the corner of the quilt.  Fold the end over to the side to make a 45 deg angle.  Press a crease.  Open the fabric back up.


 Lay the folded quadrant on the white fabric with the folded edge along the crease of the white fabric.  Place it so the outer squares of the quadrant are 6" from the edge.  Open the quadrant and adjust the placement so that both outer corners of the quadrant are 6" from the edges of the white fabric.  It may help to tape down the white fabric as you adjust the quadrant.


If the fabric is not wide enough, you may need to add a piece to that area, but no need to add to the entire lenght of the fabric. 

Measure from the edge of the quadrant to the edge of the border in several places and in both directions to make  sure the layout is square and true.  Check that the edge of the quadrant is at 90 deg to the edge of the border.

Mark a cutting line from the corner of the quadrant to the outside of the border.
With small pins mark the round edge of the quadrant.  Remove the quadrant.  Mark a cutting line 1/2"  from the pins toward the center of the quilt.  Cut out the border on the lines.  You may chose to leave an inch or so extra on the cutting lines where the borders will be joined and trim after the quadrant is sewn to the border.  Just a bit of insurance in case the fit is a bit off. 


  Here is the border with the quadrant.  The parts look diferent size, but will fit together.

Use the first border piece as a template to cut 3 more.  Here are some layouts for placing and cutting.  Choose the one that best fits the width of your fabric.  If the fabric is too narrow you may need to add a piece.


Applique

Do the applique before sewing the borders to the quadrants.  The template for the applique can be found here:

https://docs.google.com/viewer?a=v&pid=explorer&chrome=true&srcid=0B3eYMLiu2YC-NzhjZjhhNTUtMzU3ZC00MDI5LTgzNjctMzAzYTdhNGFhY2E5&hl=en


The templates are full size, need to be fit together.  I cut mine from freezer paper.  Fold the the paper.  Place the downloaded template on the fold.  Cut out.  A few staples will help hold it in place. 

Here is a layout that can be used to cut out the appliques and get bias binding strips.


For needle turn, iron the template to the fabric, then mark the outline and cut outs.  Carefully peel off the template. The template can be used many times.  Cut out the applique with a scant 1/4" allowance.  Cut a small slit in the cut outs.  Leave the extra fabric in the cut outs untill you are ready to applique tht area.  This will make it easier to handle the loose applique. 

Fused raw edge may also be used. 

Sew the borders to the quadrants then sew the 4 sections together.  Cut a circle of red and applique to the center.  There is a lot of bulk in the seams near the center.  I cut a small round of batting to fit the hole from the back and whip stitched it in place to the ends of the wedges to help fill the void.  This is in addition to the regular batting.

Quilting


You can see the quilting on the outer rows is a criss-cross pattern.  The rest is straight lines to the center.  Not all the lines need to go all the way to the center.

Cut binding 2 1/4" wide in red on the bias.

There is a full page photo of the 1910 Vortex quilt in the June/July 2011 issue of Quilt magazine on the last page.  I have also seen the quilt in several books. 

I also found a photo in a book with a quilt almost like this one.  It is believed that both were made by the same maker.  Note the one without the curliques has a white dot in the center.


I hope these instructions work for you.  Please let me know if there are any problems.

Sunday, April 17, 2011

Red and White Vortex Part 2

MAKING THE WEDGE TEMPLATE

The red and white Vortex quilt has 52 wedge shaped segments.  That is a 6.923 deg angle.  The template needs to be about 38" long.  The exact length will be determined by measuring your strip sets, as explained later.  A very large protractor would be needed to make an accurate angle.  I found it was better to draw the template from calculations.  I picked places that had measurements as close to 1/8" as possible and rounded the numbers.  This will be close enough to make a usable template. 

The same template is used if you are cutting complete wedges of 21 rows, or if you are cutting the wedges in sections. I will show how this done.  But first, the template:

Freezer paper works well (draw on the dull side), but any paper over 40" long  and 5" or 6"wide will work.

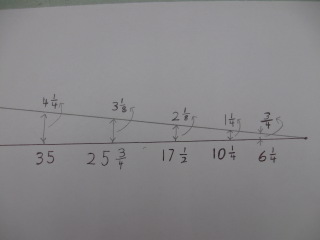
Draw a 38" straight line, (1/2" or so from the edge) along the length of the paper , starting 1/2" or so from the end.  From the end make a mark at these points along the line:

mark              distance                            
on line            of dot (next step)
6  1/4"            3/4"                                   
10  1/4"          1  1/4"
17  1/2"          2  1/8"
25  3/4"          3  1/8"
35"                 4  1/4"


Place a square ruler on the line and make a dot directly above the marks on the line the distances given above.  (Trigonometry purists will say "This will make a right triangle! We need an isosceles triangle!"  These numbers have taken that into account.)

Draw a 38" line thru the set of dots to the end of the line.  Some of the dots may be a bit off  (the one above the 10  1/4" mark most likely).  Keep the line straight, missing the dot if necessary.   This should result on a ~6.9 deg angle.

Cut out the template.

Draw a 1/4" sewing line along both long sides of the cut template.  These lines are just to use as a reference  to check that you are not cutting too deep into the template as you are using it to cut the wedges. 

Fold the template in half the long way.  Do not worry too much about getting a nice fold on the last 2 or 3 inches of the tip.  They will be trimmed away.  This fold will be used when marking the template with lines to match up with the seams on the strip sets.  It will help keep the seam line marks square with the template.

Place a ruler on the template lining up a line on the ruler with the fold.  Slide the ruler to the place where the template is 1/2"  wide.  This is where the sewing lines should cross, but do not fret if they do not cross exactly there.  Cut the tip off the template at this place.


The template is now ready to place on your strip set and mark the seam lines of the strip sets, but first a bit about the cutting and assembly.


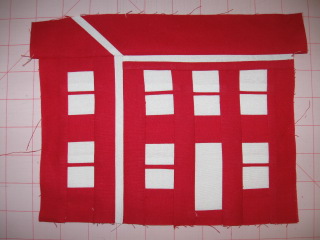
This quilt will be made in 4 quadrants.  The wedges at the sides of the quadrants will have extra fabric left untrimmed beyond the seam allowances.  The quadrants will be pressed well, then trimmed into a right angle.  This will insure that they will fit together and lay flat. Most likely the pieces on the outside wedge will end up a bit larger or smaller that the other wedges, but that difference will be hard to detect in the finished quilt.  This is true of the quilt I have in the photo, but you would have to measure the pieces to tell. (Any quilt police who want to measure can go find a 9 patch to pick on!)

Each quadrant will have 13 wedges.  2 quadrants will  have wedges on the outsides that are white at the top and bottom.  The other 2 quadrants will have wedges on the outsides that are red at the top and bottom.

CUTTING WEDGES

IF YOU MADE  FULL  STRIP SETS (21 ROWS):

Read thru these instructions before you start to cut to have an idea of what you should end up with.  You will leave some wedges untrimmed on one side.

Make sure your strip sets are pressed well, seams to the red.  Place the template on the strip set with the narrow edge on the edge with the 2" strip (for the center). 
Place a square ruler on the template, with a line on the ruler lined up with the fold in the template.  Adjust the template so the seams are perpendicular to the fold.  Draw a line on the template at each seam and at the outer edge of the strip set. 

Each time you cut a wedge, match the lines with the corresponding seam.  I found they did not always match as well as I would have liked, but match as closely as possible.  Use flat head pins to secure the template, or small bits of double sided tape (or single sided tape formed into a small roll) to help hold the template in place.  If you used freezer paper, iron a few small spots to help hold it in place.  Use a ruler and rotary cutter to cut out the shape, placing the ruler on the template with the edge along the template edge.

Be careful in picking the wedges up from the mat.  The short seams are easy to pull apart.

You will cut 26 wedges with white at the top and bottom.  2 of those wedges will be left untrimmed on the right edge and 2 will be left untrimmed on the left edge.  You should be able to cut 7 wedges from a strip set and still have room to leave 2" extra on the left of one wedge and 2" extra on the right of an other wedge.  Also cut 7 wedges from the next strip set, leaving the 2" extra on the left of one and 2" extra on the right of one.  Cut 8 wedges from the last full strip set, all of them trimmed.  The half strip set should give you 4 wedges.  That should give you 22 finished wedges, and 2 untrimmed on the left, and 2 untrimmed on the right.

Now cut the strip sets starting and ending in red the  same way. 

52 total wedges:

22 trimmed starting and ending in red
2 untrimmed on the left starting and ending in red
2 untrimmed on the right starting and ending in red

22 trimmed starting and ending in white
2 untrimmed on the left starting and ending in white
2untrimmed on the right starting and ending in white

IF YOU MADE PARTIAL STRIP SETS:

(Read the instructions above for full strip sets to understand what kinds of wedges you will be making.)


Place the template on the  strip set for rows 1 thru 9 with the narrow end at the 2" wide strip.   Place a square ruler  on the template with a line matching the fold line on the template. Adjust the template and  mark the seam lines.  Make a mark 1/4" from the outer edge where the sewing line will be when the parts of the wedge are assembled.  (You may also draw a line at the outer edge if it helps with placement.)


Cut 26 wedges from the strip set for rows 1 thru 9, starting and ending in white.  Leave 1/2" untrimmed to the left on 2 wedges and 1/2" untrimmed to the right on 2 wedges.
Cut 26 wedges from the other strip set for rows 1 thru 9, starting and ending in red.  Leave 1/2" untrimmed on the left of 2 wedges and 1/2" untrimmed on the right of 2 wedges.  These narrow untrimmed wedges look so much alike it is hard to tell them apart.  Mark the untrimmed edge with a pin or sticker to keep track.  (This is a place to use up some of those address labels we all get in the mail.)


Here the first 26 have been cut, starting on the next 26.  Notice the 4 wedges that are untrimmed on one edge.


Place the template on the strip set for rows 10 thru 17.  Place the last seam line you drew for the first strip set 1/4" from the edge where the sewing line will be.  Draw the seam lines for this strip set.  Mark the last line 1/4"  from the other edge where that sewing line will be.  (Draw another line on the outer edges if you find it helps to line up the template)

 Match these lines with the seams lines as you cut out wedge sections from strip sets beginning  in red.  Each full strip set should give you 11 wedges, 2 from each strip set untrimmed.  (total of 2 untrimmed on the left, 2 untrimmed on the right)   Cut 4 more trimmed wedges from the half strip set.

Cut out the wedge sections from the strips sets beginning  in white.

Now place the template on the strip set with rows 18 thru 21.  Place the last seam line 1/4" from the edge as before.  Mark seam lines.  Mark the last line on the outer edge.


 From the strip sets starting  in red, cut 7 wedges, 2 untrimmed, from each of 2 full strip sets.  (2 untrimmed on the left, 2 untrimmed on the right).  Cut 8 trimmed wedges from the last full strip set and 4 trimmed wedges from the half strip set. 

Cut the same wedge sections from the strip sets starting  in white.

Sew the sections together into full wedges.  Sew untrimmed sections together, lining up the trimmed sides.  The untrimmed sides will be jagged, that is OK, that is where we will trim later to get nice square corners for the quadrants.


There should be enough sections to make these wedges:

22 trimmed starting and ending in red
2 untrimmed on the left starting and ending in red
2 untrimmed on the right starting and ending in red

22 trimmed starting and ending in white
2 untrimmed on the left starting and ending in white
2 untrimmed on the right starting and ending in white


Saturday, March 26, 2011

Red and White 1910 Vortex Quilt, Part one


The original quilt was on display in New York the last week of March as part of the show at The American Folk Art Museum.  The original was made around 1910.   I have made 2 of these, working on another. 
Feel free to contact me with any questions.

Overview

Size: 84 x 84

Yardage:  7 yds red
                7  1/2 yds white

1   yd less of each fabric is needed if you choose to cut in the thrifty method described later.

Read ahead in the instructions and you will get an understanding of how this will go together.

This quilt is strip pieced, goes together much quicker than it looks.  Strip sets are made with graduating sizes of strips.  Narrow wedges are cut from the strip sets and sewn to form the bullseye center.   I learned a few hints along the way that I will share.  There are 52 wedges, 21 strips in each wedge.  Dividing a circle into 52 wedges gives an odd angle, one wonders why that number was chosen.  52 weeks in the year?  52 cards in a deck?

There are 2 kinds of strip sets.  One starts and ends with red, the other starts and ends with white.

The cutting of  wedges leaves a lot of waste scraps.  You can not just flip your wedge template upside down and cut the next wedge the other direction because you would end up with the wrong size red and white pieces in the wrong order. To save fabric, I give directions to cut the wedges in parts then sew them together.  That will save about 1 1/2 yards of each fabric.  It is not a great lot of extra sewing, but you may choose to just cut the entire wedge from a whole strip set.  You may have ideas to use up the scrap.

I used a white bed sheet (don't call the quilt police!).  A wide sheet can be split in half and used like yardage.  I did this because I felt it would give a bit of sheen and would be durable.  I machine quilted, so that was not a problem.  I had no problem doing needle turn applique on the sheet fabric.  Also a sheet was inexpensive.

Cutting strips

Tip:  Store the cut strips in the pages of a note book or a road atlas to keep from getting them mixed up.  All of one "row" in each page.

If you plan to cut whole wedges all at once, you will need to make 3 full and one half strip sets of both kinds (begining and ending in red, and begining and ending in white).
 
So, for each row cut 3 red strips and 3 white strips.  Place them for safe keeping between the pages of a note book, one row (3 red, 3 white) in each page. Then cut a 25" length of each fabric.  Cut each in half along the fold giving you  25" by (approximately) 22".   Cut a set of each color from these,  (half as wide as the other strips).
 Be careful to cut along the  (+ or -) 22" edges, or you will run out before all are cut.  Keep these half strips in the same page as the full strips of the same width.

OR,

If you want to save a bit of fabric,  cut one strip of each color rows 1 thru 9.
Cut 2 full strips and 1 half strip of each color rows 10 thru 17.
Cut 3 full and 1 half strip of each color rows 18 thru 21.

 To get the half strips, cut a 20" length of each fabric.  Cut in half along the fold.  You have 20" x (about) 22" pieces.  Cut half strips for rows 10 thru 21 from these pieces, cutting along the 22" edge.  1 red and 1 white for each row.

Cut strips in these widths:

row   width
1    2"
2    1"
3    1"
4    1   1/8"
5    1   1/8"
6    1   1/4"   
7    1   3/8"
8    1   3/8"
9    1   1/2"

10   1   5/8"
11   1   3/4"
12   2"
13   2   1/8"
14   2   3/8"
15   2   1/2"
16   2   3/4"
17   3"

18   3   3/8"
19   3   3/4"
20   4   1/8"
21   4   5/8"

Making strip sets

Sew with close stitches, these wedges are cut narrow at the end and stitching can come undone.
Be carefull on the first few rows not to get the order of rows mixed up.  It is easy after about row 8 to start sewing on the wrong edge (row 1). 

If you are going to cut whole wedges, make strips sets with all rows 1 thru 21.  3 full width sets and a half width set will start and end in red.  3 full width sets and a half width set will start and end in white.  Press to the red.

If you are making the wedges in sections:
Use rows 1 thru 9 to make a strip set starting and ending in white, and one strip set starting and ending in red.
Use rows 10 thru 17 to make 2 strip sets starting and ending in white and 2 strip sets starting and ending in red.

Use rows 18 thru 21 to make 3 full and one half strip sets starting and ending in white.  Make 3 full and one half strip sets starting and ending in red.
Press to the red.

In this photo the strip sets for rows 1 thr 9 and 10 thr 17 are done.  Rows 18 thru 21 are still in the pages of the road atlas.  The wedge template is also shown. 

Comming soon, I will show how to make the template.

Red and White House Quilt

1910 Red House Quilt

I saw a red and white house quilt in The Ultimate Quilting Book by Maggi McCormick Gordon.  The quilt was made in NY or Pennsylvania around 1910. I decided to draft the blocks in a small size for a wall hanging.  The quilt will finish

31" by 29".  Feel free to use my sketch to make any size you like. 

This block is partly strip pieced
Use 1/4" seam allowances, press to the red
Cut strips across the width of fabric at least 43" wide.


First, make 2 full strip sets and one 1/2 strip set from these strips:
         
          1 1/4" white
          3/4" red, folded wrong sides together
          1 3/8" white
          1 1/2" red

The folded red strip is sandwiched between the 2 whie strips sort of like you would add piping.  The lower strip of white is 1/8" wider than the upper white strip.  This will make the finished window panes apear to be the same size after the folded red flap is pressed toward the wider white strip, forming a window pane.  Press.


FRONT: DOOR / WINDOW

Cut a 15" section off the 1/2 strip set, (save the 2 long sets) and to the red edge add  15" long strips:
         
          2 7/8" white
          3/4" red

Press.  Trim the end, cut 9 (nine)   1 1/2" sections.  Set aside for later.


FRONT: WINDOW / WINDOW

Sew 2 long strip sets together, white to red.  Cut the left over short strip set  in half and sew them together the same way.  Trim and cut 18    1 1/2" window sections.  Use the short strip set first as the leftovers from the long set are needed  in the next step for the house end.  Tip:  Keep the sections true by squaring up the strip set evey few cuts.  Set these window sections and the door sections aside untill the ends are made.  We will complete them when we know the exact measurment of the ends.


HOUSE END

Add a 1" red strip to the white edge of the remaining strip set. Press, trim and cut 9   1 1/2" sections.


Sew 1 1/4" red strips to each side of the window sections that are a bit longer at each end.  Press and trim even with the window sections.  This is a way to help keep the blocks even.  Place the ruler with a line on one of the seam lines to keep the ends square. 


COMPLETEING HOUSE FRONTS

Assemble the fronts by sewing sections as follows.  (Be careful not to flip one of the window sections upside down.)  Sew a red 1 1/4" strip to each side of  the window/door section that is a bit longer than needed at both ends.  Square up and trim with a ruler, being careful to keep the lines of the ruler paralell to the stitching lines.


  Add a window section to each side.


 Add a 1 1/4" red strip to each side, leaving it a bit long and trimming as before.


It is more important that blocks be uniform sizes than that they match the sketch.  I did a SMALL amount of trimming on some of mine.

Now the red and white section above the windows.  If all went well, at this point the house ends should be 1/2" taller than the house fronts.  If so, make 2 strip sets of 3/4" white and 3/4" red strips.  Press.
If the house ends are more than 1/2" taller than the fronts, cut the red strip wider by that much.  If the house ends are less than 1/2" taller, cut the red strip narrower by that much.  It is better to make this adjustment on the red strips, not the white.


Tip:  You may want to pair up sides and fronts so the sets are closer to 1/2" different in size.


 Sew the strip set to the top of the house front with the white to the outside, leaving a bit extra on the ends and trimming as before.  Press.


Sew a 3/4" white strip to the left edge of the house front.


Sew a house end to the front. 


Tip:  I used the left edge of my presser foot to make an even 1/4"  wide white "trim" strip, sewing with the white on top.


ROOF AND SKY

Cut 9  10" x 1 3/4" red strips.  These are longer than the block, but will be trimmed later.

On the original quilt the peak of the roof does not line up exactly above the center of the windows on the house end.  Placing a ruler on the photo in the book shows that the tip if the peak is actualy above the window to the right of center.


 I chose to make my quilt with the peak centered, but if you want to stay true to the original, cut the angle of the roof this way:

 Make a mark 2" from the left end along the top of the red roof strip.  Make a mark 3 1/2"  from the left on the bottom.    Cut from mark to mark.

If you want to keep the peak centered, make a mark 1 3/4" from the upper left corner, and a mark 3 1/2"  from the lower left corner.  Cut from mark to mark.  (45 deg angle)


Sew a 3/4" white strip along the cut edge of the larger roof piece, leaving it a bit longer and trimming. Press.  Sew the peak part of the roof to the white strip, being careful that the strip is straight when pressed open.  Press to the red.


ADDING THE ROOF TO THE HOUSE


To help in matching points, draw a light pencil line 1/4"  from the lower edge of the roof section along the white "trim".  Draw a light pencil line 1/4" from the top edge of the house block on the vertical white "trim".  Place the roof  section on the house section, right sides together.  Use a pin to match the edges of the left seams of the white "trim" strips.


 The seam to the right on the roof "trim" will not line up with the seam to the right on the house "trim" because of the angle of the roof "trim".  (I like to leave the pin in place sticking straight up, then add a pin on each side to secure, then remove the first pin.)   Sew the roof to the house.  Sewing on the white will help to keep the white strip an even width as before.   Press well, try to keep the block square.  Trim the roof ends.


On the back of the block make a light pencil mark 1/4" from the edge at each end of the seam connecting the roof to the house.  Also make a mark 1/4" from the top edge where the "trim" meets the place where the peak of the roof will be.  Be careful to make this mark at the peak, not on the other edge of the "trim".  I messed up a few of my blocks.  Also a mark 1 3/4" from the upper corner on the other end of the roof.  Draw  sewing lines from mark to mark.


Place a 2" white square (2 1/2" if you moved the peak) under the corner of the block.  This square is a bit larger than needed, but we will trim.  Sew on the line.  Press the square upward.  Trim even with the background, then cut away the extra layer, leaving a seam allowance. 


Make a light pencil mark 1/4" from the top edge at both ends of the red roof.  Use these when adding the chimney/sky section.

CHIMNEY/SKY

Cut 15" strips for the chimney/sky section.  If all your cutting and sewing was totaly acurate, cut the strips in the following sizes.

          Red      1  1/4"
          White   5 1/4"
          Red      1 1/4"
          White   1 3/4"

The reality is your blocks are probably not 9 1/4" wide.  (mine were not)  They may not even be alike.  Pick one that is an average size to take measurements.  Take measurements 1/4" below the top edge to get acurate numbers due to the sloped seams.

          White       from the edge to the roof top plus 1/4"
          Red          1 1/4"
          White        tip to tip of roof minus 1"  (this alows for the chimneys and seams)
          Red          1 1/4"
          White        peak to edge plus 1/4"

Assemble strip set, press, trim and cut 9   1 1/2" strips.


When sewing chimney strip to the house, be careful to place the strip  so the white ends are on the correct end if those parts were not the same size.  Use a pin to line up points as before.  This is the most tricky part of the block.  You may want to baste the areas where the chimneys meet the roof, check the alingment, then sew the entire seam.  It may save some "unsewing".  Press.


SASH

Cut sahing strips 1  1/2" wide.  Use red for the binding.